Domain Identity
For scalability and ease of management, Antimatter handles user authentication and authorization as a three-step process:
- First, a user picks an identity provider that has been configured in the domain and authenticates using that identity provider
- The authenticated user is mapped to a set of Antimatter capabilities based on capability mappings associated with the identity provider and by using the principal rules configured for that identity provider
- All authorization for users in domain policy and context policy refers to those capabilities, not individual subject identifiers (such as email addresses).
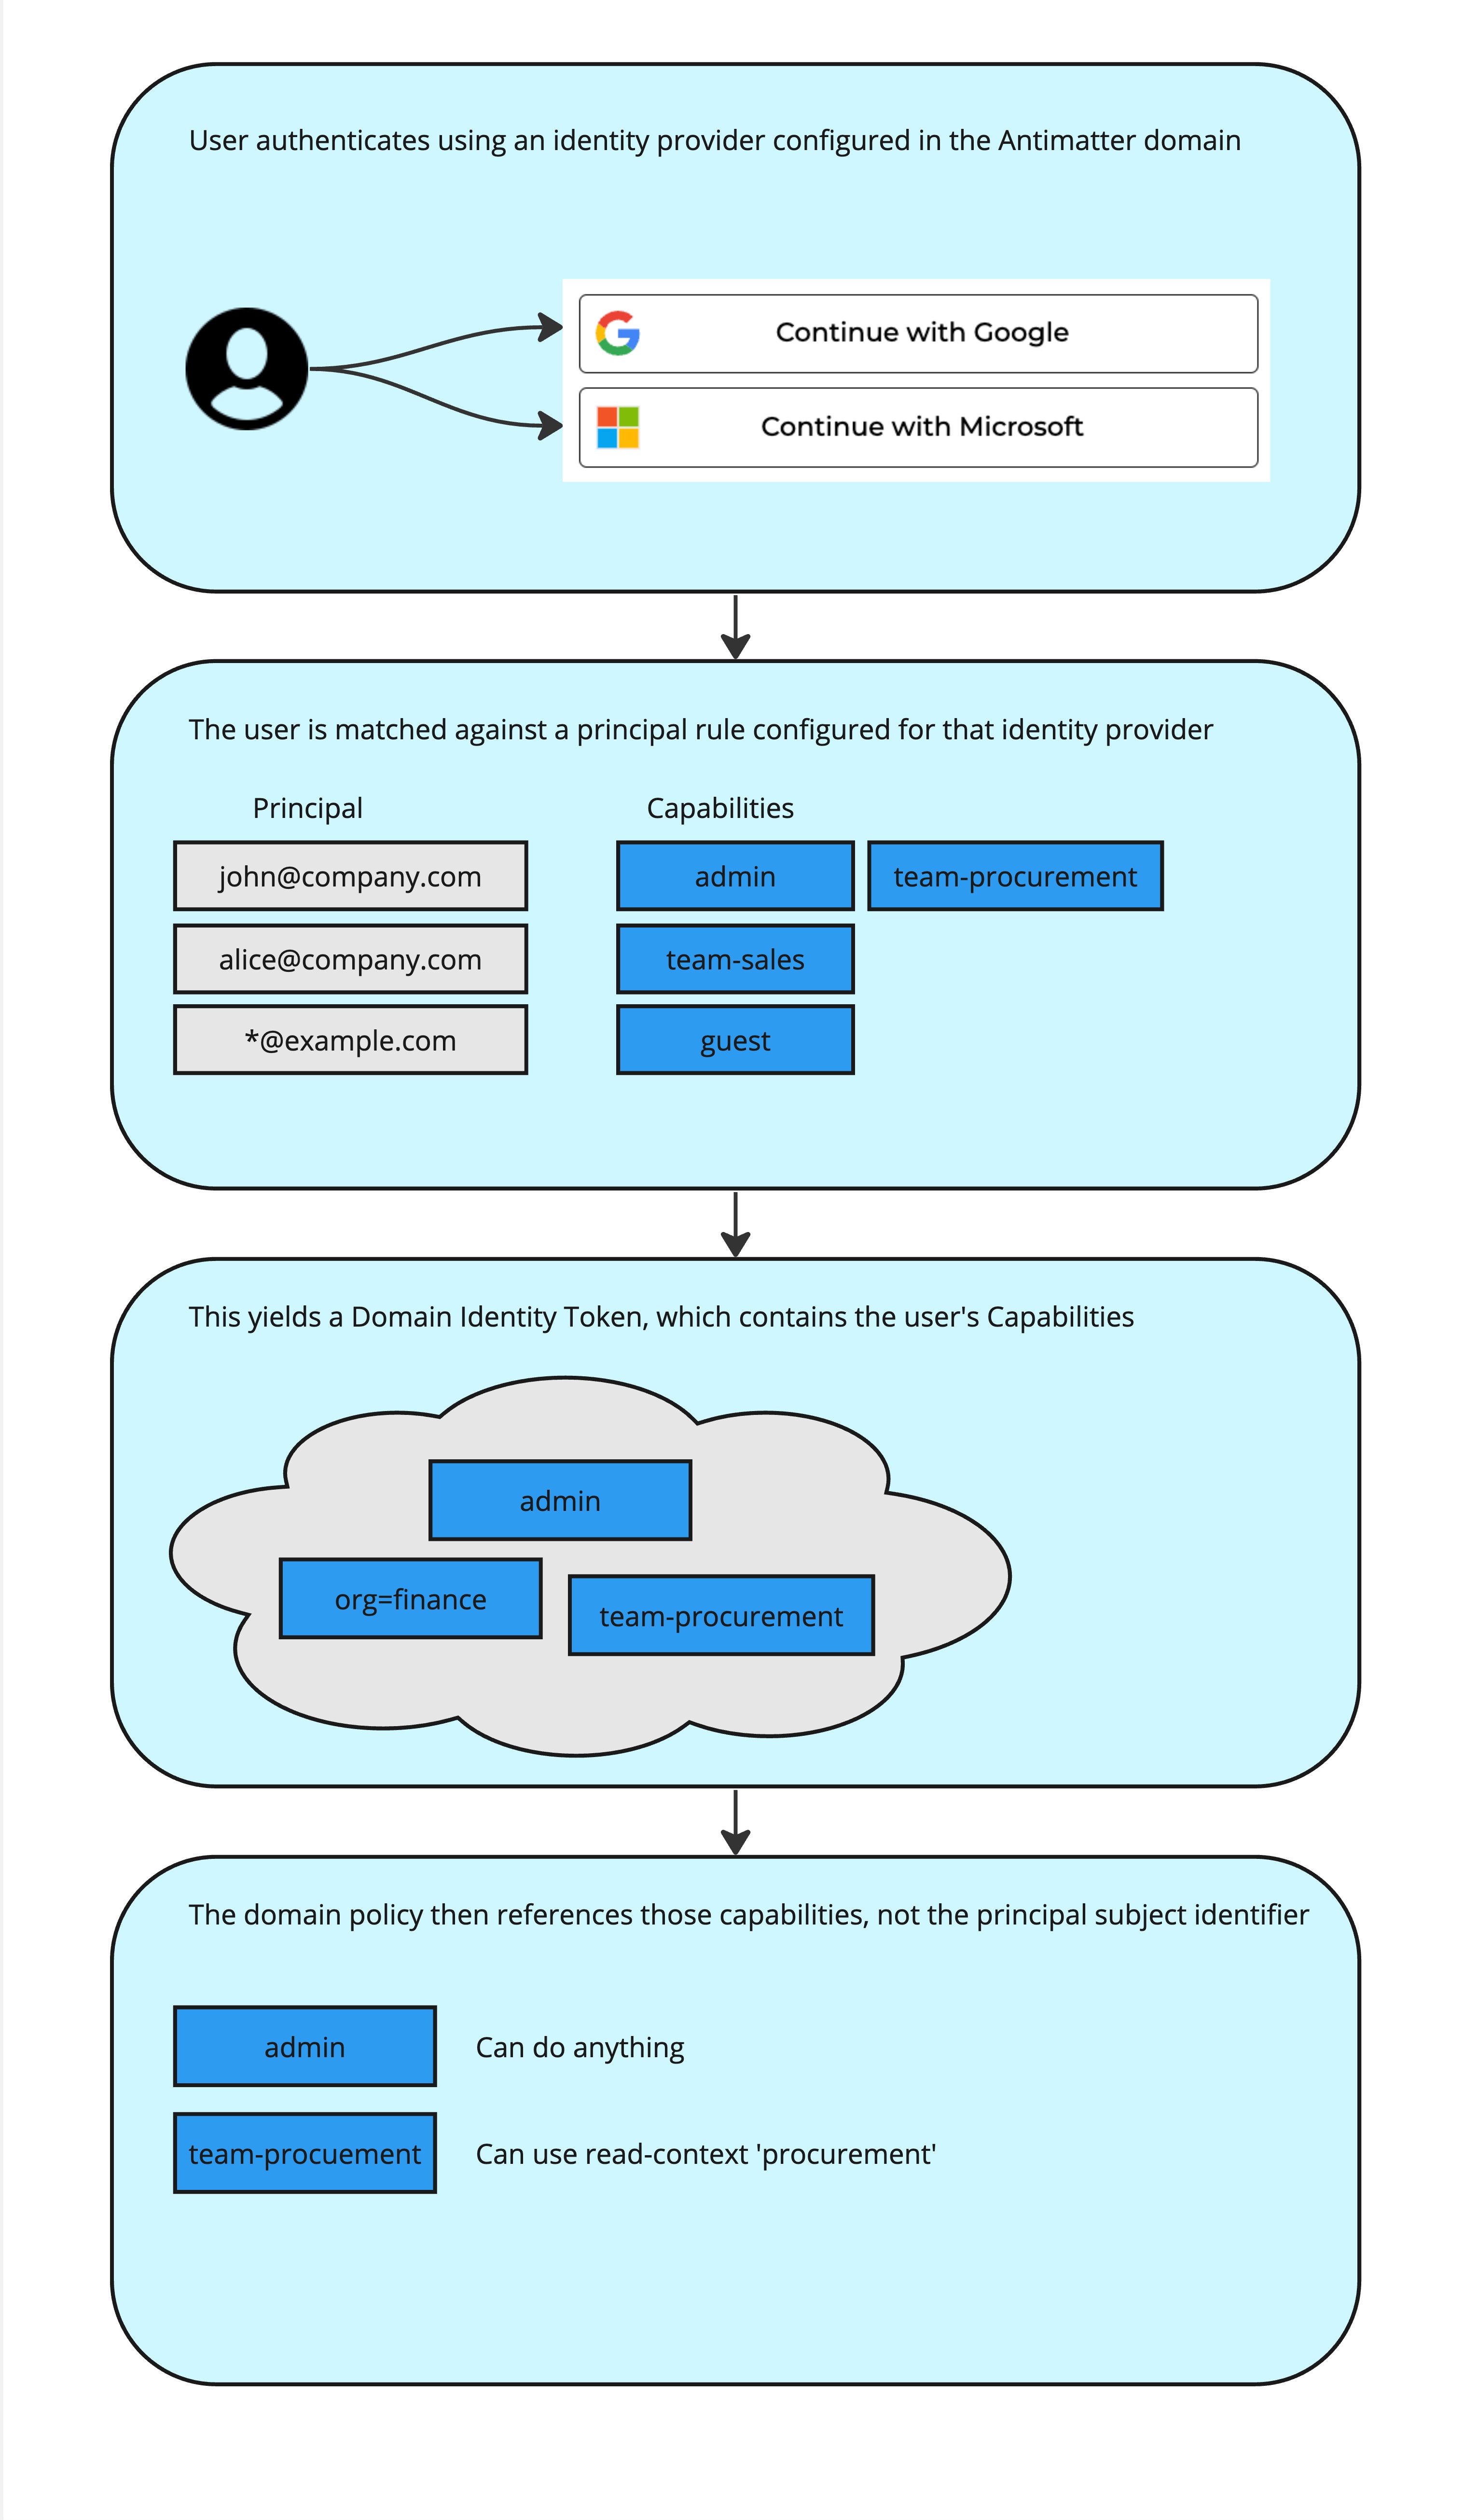
This neatly divides authorization into two problems that are more easily solved in isolation:
- What capabilities should a specific user or set of users have (similar to roles in RBAC)
- What should a capability let a user do
Antimatter comes with some default capabilities and corresponding domain policy pre-defined:
- admin: lets a user do anything, including editing sensitive settings for the domain
- data-reader: lets a user read all capsules and view non-sensitive settings for the domain
- data-writer: lets a user create new capsules and view non-sensitive settings for the domain
Capabilities can also have a value (e.g. team=finance) but if a user can be a member of more than one team, it is often better to use distinct unary capabilities to capture that information (e.g. a user could have team-finance and team-analytics) because a user cannot have more than one capability with the same name (regardless of the value of that capability).
Identity providers
Antimatter currently supports Google Workspace (sign in with Google) as an identity provider type, including any SSO integrations (such as Okta). We are adding support for Microsoft as an IDP as an identity provider type in the next release. There is also an API Key identity provider type which is more convenient for authenticating service accounts or using in some analytics workflows.
It is possible to have more than one identity provider of the same type configured in a domain (e.g. two Google IDPs). This permits you to partition the management of those IDPs in more advanced use cases. For example, if you are sharing data with a third party, you would encapsulate the data in a domain you created, using identities in an identity provider you created. You would then create an identity provider for the party you are sharing with, and configure the domain policy to let them add the principals they want to that IDP (so they can pick which of their employees have which access to the shared data).
Furthermore, each identity provider can be set up with its own capability mappings, allowing further partitioning of capabilities. See Capability Maps for more information on capability mappings.
By default, a newly created domain has an API key identity provider, with one principal having the admin capability. You can add an identity provider using the web UI or using the language bindings:
- Python
- CLI
import antimatter as am
amr = am.load_domain(domain_id="dm-xxxxxxxx", api_key="xxxxxxxxx")

# add a google identity provider
amr.upsert_identity_provider("my_google_provider",
                             am.IdentityProviderBuilder()
                             .set_provider_type(am.ProviderType.GoogleOAuth),
                             )
# add an apikey identity provider
amr.upsert_identity_provider("my_apikey_provider",
                             am.IdentityProviderBuilder()
                             .set_provider_type(am.ProviderType.ApiKey),
                             )
# add a google identity provider (apikey identity providers not available in cli)
am idp create --name my_google_provider
You can add, list and remove principals from an identity provider using the web UI or language bindings as follows:
- Python
- CLI
import antimatter as am
amr = am.load_domain(domain_id="dm-xxxxxxxx", api_key="xxxxxxxxx")

# add a Google identity principal for a specific email address
amr.insert_identity_provider_principal("my_google_provider",
    principal_type=am.PrincipalType.Email,
    principal_value="bob@mycompany.com",
    capabilities={
        "admin": None, # admin capability has no value (unary), hence the None
    })

# add a principal rule that permits any authenticated user at a given domain
amr.insert_identity_provider_principal("my_google_provider",
    principal_type=am.PrincipalType.HostedDomain,
    principal_value="mycompany.com",
    capabilities={
        "admin": None,
    })

# add an apikey principal
amr.insert_identity_provider_principal("my_apikey_provider",
    principal_type=am.PrincipalType.ApiKey,
    capabilities={
        "admin":None
    })
# this returns the created API key:
# {
#  'principal_id': 'pr-ADZRTAgAgmW',
#  'api_key': 'bXlfYXBpa2V3X3Byb3ZpZGVyOkFyWkdmM1lna3hxWUYieWpDTjlMTkN5eHJyTXBXNkpj'
# }

# list APIkey principals:
amr.get_identity_provider_principal("my_apikey_provider")
# this returns:
# [{'principal_id': 'pr-ADZRTAgAgmW', 'principal_type': 'APIKey'}]
Please note: Examples for these commands are currently under development and will be available soon. We appreciate your patience and encourage you to check back soon for updates.
A capability must already exist before it can be assigned to a principal, see the next section for working with capabilities
Capabilities
As described above, capabilities are how Antimatter normalizes a principal's identity even though it may have come from any number of identity provider types. They are configurable roles that can be used to dictate the actions that an associated identity can perform within a given domain. These actions are governed through domain policies (see Domain Policy) which dictate what resources the capability will allow or prohibit. As a principal can be associated with multiple capabilities, a well-thought-out set of capabilities will simplify your policy rules and remove the need to ever reference a specific user in a rule.
Example 1: Onboarding role
For example, let us create a new limited capability that will allow a principal to perform onboarding of a root encryption key. To create a capability, you can use the language bindings or the CLI:
- Python
- CLI
import antimatter as am
amr = am.load_domain(domain_id="dm-xxxxxxxx", api_key="xxxxxxxxx")

# create a new capability called 'onboarding'
amr.put_capability("onboarding",
    summary="onboarding support",
    description="can perform onboarding operations for a domain",
    unary=True)

# list capabilities:
amr.list_capabilities()
Which returns
[{'name': 'admin',
  'unary': True,
  'summary': 'domain administrator',
  'description': 'grants all permissions to the principal',
  'imported': False,
  'source_domain_id': None,
  'source_domain_name': None},
 {'name': 'onboarding',
  'unary': True,
  'summary': 'onboarding support',
  'description': 'can perform onboarding operations for a domain',
  'imported': False,
  'source_domain_id': None,
  'source_domain_name': None}]
# create a new capability called 'guest'
am capability create \
  --name onboarding \
  --summary "onboarding support" \
  --description "can perform onboarding operations for a domain" \
  --unary

# list capabilities:
am capability list
Which returns
capabilities:
- name: admin
  unary: true
  summary: Domain administrator
  description: Grants all permissions in the domain
  imported: false
- name: onboarding
  unary: true
  summary: onboarding support
  description: can perform onboarding operations for a domain
  imported: false
Note that the created onboarding capability does not automatically confer any permissions. To address this, it is necessary to create one or more domain policy rules that let that capability interact with the domain. Creating a domain a policy involves specifying a resource path along with the desired action. These resources can be listed using:
- Python
- CLI
import antimatter as am
amr = am.load_domain(domain_id="dm-xxxxxxxx", api_key="xxxxxxxxx")

# get a list of all the resources you can reference in a rule path:
amr.list_resources()
# get a list of all the resources you can reference in a rule path:
am domain resources
For more information on these resources along with a full map of current domain resources, see the Domain Policy.
Associating a resource with a capability is done by creating a domain policy to represent the resource and then binding that policy to the capability. Domain policies are evaluated in priority order, and the result for the first matching rule is what takes effect. Rules are created with a priority of 0 (highest) by default. You can also clean up all the priorities for the rules, assigning them to unique multiples of ten based on the current ordering of the rules by calling renumber. To allow the newly created onboarding capability permission to perform onboarding operations, it requires the access to the following resources:
- 'view' permission for
control/encryption - 'edit' permission for
control/encryption - 'view' permission for
control/vendor/settings
- Python
- CLI
import antimatter as am
amr = am.load_domain(domain_id="dm-xxxxxxxx", api_key="xxxxxxxxx")
capability = "onboarding"
amr.create_policy_rule(
    path="control/keys",
    operation=am.Operation.View,
    result=am.Result.Allow,
    priority=105,
    capability_rules=am.CapabilityRulesBuilder()
    .with_rule(capability, am.CapabilityOperator.Exists))

amr.create_policy_rule(
    path="control/keys",
    operation=am.Operation.Edit,
    result=am.Result.Allow,
    priority=106,
    capability_rules=am.CapabilityRulesBuilder()
    .with_rule(capability, am.CapabilityOperator.Exists))

amr.create_policy_rule(
    path="control/vendor/settings",
    operation=am.Operation.View,
    result=am.Result.Allow,
    priority=107,
    capability_rules=am.CapabilityRulesBuilder()
    .with_rule(capability, am.CapabilityOperator.Exists))

# (optional) based on the current order of the rules, assign them new priorities in multiples of ten
amr.renumber_policy_rules()
# get a list of all the resources you can reference in a rule path:
am domain resources

# create a rule that lets guests use the datasci read context:
am policy create  \
  --path "control/encryption" \
  --result allow \
  --operation view \
  --priority 105 \
  --capability "exists(onboarding)"

am policy create  \
  --path "control/encryption" \
  --result allow \
  --operation edit \
  --priority 106 \
  --capability "exists(onboarding)"

am policy create  \
  --path "control/vendor/settings" \
  --result allow \
  --operation view \
  --priority 107 \
  --capability "exists(onboarding)"

# (optional) based on the current order of the rules, assign them new priorities in multiples of ten
am policy renumber
Now that a capability as been created and the necessary resource permissions have been granted, the next step is to create a principal and grant it the onboarding capability. Principles need to be associated with an identity provider (IDP) that is responsible for handling their authentication. By default, a domain is created with two IDPs:
- apikey: Principals that can authenticate using an API key that is generated when the principal is created.
- google: Principals that can authenticate using google oauth.
For this example, the goal is to create a principal that can be used for onboarding, and we will authenticate using an API key. So, to create the principal with the onboarding capabilities:
- Python
- CLI
import antimatter as am
amr = am.load_domain(domain_id="dm-xxxxxxxx", api_key="xxxxxxxxx")

result = amr.insert_identity_provider_principal(
        "apikey",
        capabilities=["onboarding"],
        principal_type=am.PrincipalType.ApiKey,
        comment="A principal intended to perform onboarding related actions")
print("The API key to use for onboarding", result['api_key'])
 am idp principal create \
  --identity-provider apikey \
  --capability "onboarding" \
  --comment "A principal intended to perform onboarding related actions"
The resulting api key can be used to create a new domain session or preform onboarding actions through the onboarding widget. If used to create a new session, not that it will only be able to perform the actions describe in the domain policies added.
Example 2: Restricted Reader
As a second example, let us create a principal that can be used to encrypt data using any write context but limit decrypting to a specific read-context called demo_analytics. We start by creating capability called analytics and the demo_analytics read context:
- Python
- CLI
import antimatter as am
amr = am.load_domain(domain_id="dm-xxxxxxxx", api_key="xxxxxxxxx")

amr.put_capability("analytics",
       summary="data analytics reader",
       description="can decrypt data using the data_analytics context",
       unary=True)

amr.add_read_context(
    "demo_analytics",
    builder=am.ReadContextBuilder().
    set_summary("data analytics").
    set_description("a read context for use by data analytics")
)
# create a new capability called 'guest'
am capability create \
  --name analytics \
  --summary "data analytics reader" \
  --description "can decrypt data using the data_analytics context" \
  --unary

am read-context create \
  --name demo_analytics \
  --summary "data analytics" \
  --description "a read context for use by data analytics"
Next we need to add the relevant domain policies to our new capability. For this example we will add access to following two resources:
- /control/write-context/* (use) will allow the capability to use all write-contexts to encrypt.
- /control/read-context/demo_analytics (use) will allow the capability to use the demo_analytics read-context to decrypt.
- Python
- CLI
import antimatter as am
amr = am.load_domain(domain_id="dm-xxxxxxxx", api_key="xxxxxxxxx")

amr.create_policy_rule(
    path="control/write-context/*",
    operation=am.Operation.Use,
    result=am.Result.Allow,
    priority=101,
    capability_rules=am.CapabilityRulesBuilder()
    .with_rule("analytics", am.CapabilityOperator.Exists))

amr.create_policy_rule(
    path="control/read-context/demo_analytics",
    operation=am.Operation.Use,
    result=am.Result.Allow,
    priority=102,
    capability_rules=am.CapabilityRulesBuilder()
    .with_rule("analytics", am.CapabilityOperator.Exists))
am policy create  \
  --path "control/write-context/*" \
  --result allow \
  --operation use \
  --priority 101 \
  --capability "exists(analytics)"

am policy create  \
  --path "control/read-context/demo_analytics" \
  --result allow \
  --operation use \
  --priority 102 \
  --capability "exists(analytics)"
With the capability prepared, we need to assign it to a principal that can be used to perform the analytics role. For this we will use Google oauth and provide an email address of our analytics principal:
- Python
- CLI
import antimatter as am
amr = am.load_domain(domain_id="dm-xxxxxxxx", api_key="xxxxxxxxx")

principal_details = amr.insert_identity_provider_principal(
        "google",
        capabilities=["analytics"],
        principal_type=am.PrincipalType.Email,
        principal_value='<email address>',
        comment="The analytics user")
am idp principal create \
    --identity-provider google \
    --capability "analytics" \
    --email "<email address>" \
    --comment "data analytics user"
The email address can then be used to authenticate and get a domain session that has access to the resources we defined in the domain policies. This will allow us to encrypt using any write-context but only decrypt using the demo_analytics context. To demonstrate this:
- Python
- CLI
import antimatter as am

amr = am.Session.from_google_oauth("<domain-id>")
# create a capsule using the 'default' write context.
capsule = amr.encapsulate(data={"demo":"data"}, write_context="default")

opened = capsule.load("demo_analytics")
print("opened with demo_analytics:", opened.data())

try:
    opened = capsule.load("default")
    print("opened with default:", opened.data())
except:
    print("unable to open the capsule using the default write context")
am config domain login --domain-id <domain-id> --oauth-provider google
am open --read-context demo_analytics --in capsule
# The following should return an error of the form:
#     error: Error: creating SealedV2Capsule: insufficient permissions
am open --read-context default --in capsule
Capability Maps
Capability maps provide an alternative approach to assigning capabilities to users authenticating via a Google Workspace based identity provider. When creating an identity provider, you can supply a mapping of Google Workspace groups to specific capabilities. When a user authenticates using the identity provider, the workstation groups they are a part of are collected, and they are automatically assigned capabilities associated with those groups as dictated in the capability map.
Granting group reader permissions
In order to support capability maps, we require permissions to access the group mapping within the Google Workspace in question. To support this, we require the following two components:
- The Google Workspace must grant Antimatter domain-wide delegation for the scope
admin.directory.group.readonly. - An account that has the role
Groups Readerwhich we can use to fetch the groups information of the authenticating user.
To grant Antimatter domain-wide delegation for the scope admin.directory.group.readonly we will first nee to collect the Antimatter client ID. This can be done using either the CLI, or the python client:
- Python
- CLI
import antimatter as am

amr = am.new_domain("test@mycompany.com")
providers = amr.list_group_providers()
print(providers[0].account_details)
am idp group-mapping list-group-providers
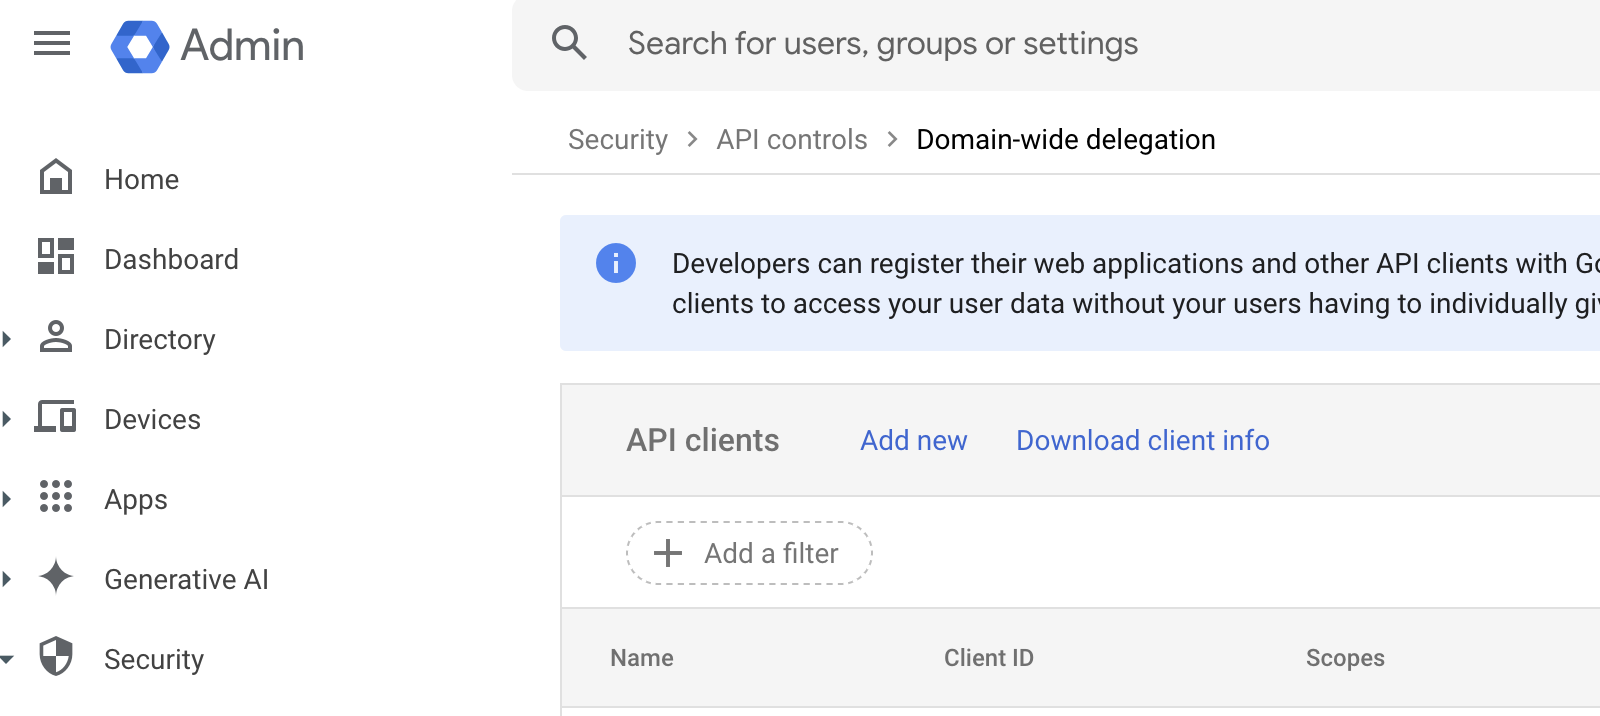
Once collected, log into the google admin console, navigate to Security -> API controls -> Domain-wide delegation, and click "Add new". In the prompt window, insert the client ID collected and then add admin.directory.group.readonly, in the OAuth scopes field. This will grant the Antimatter service account a scope for only retrieving group, group alias, and member information.
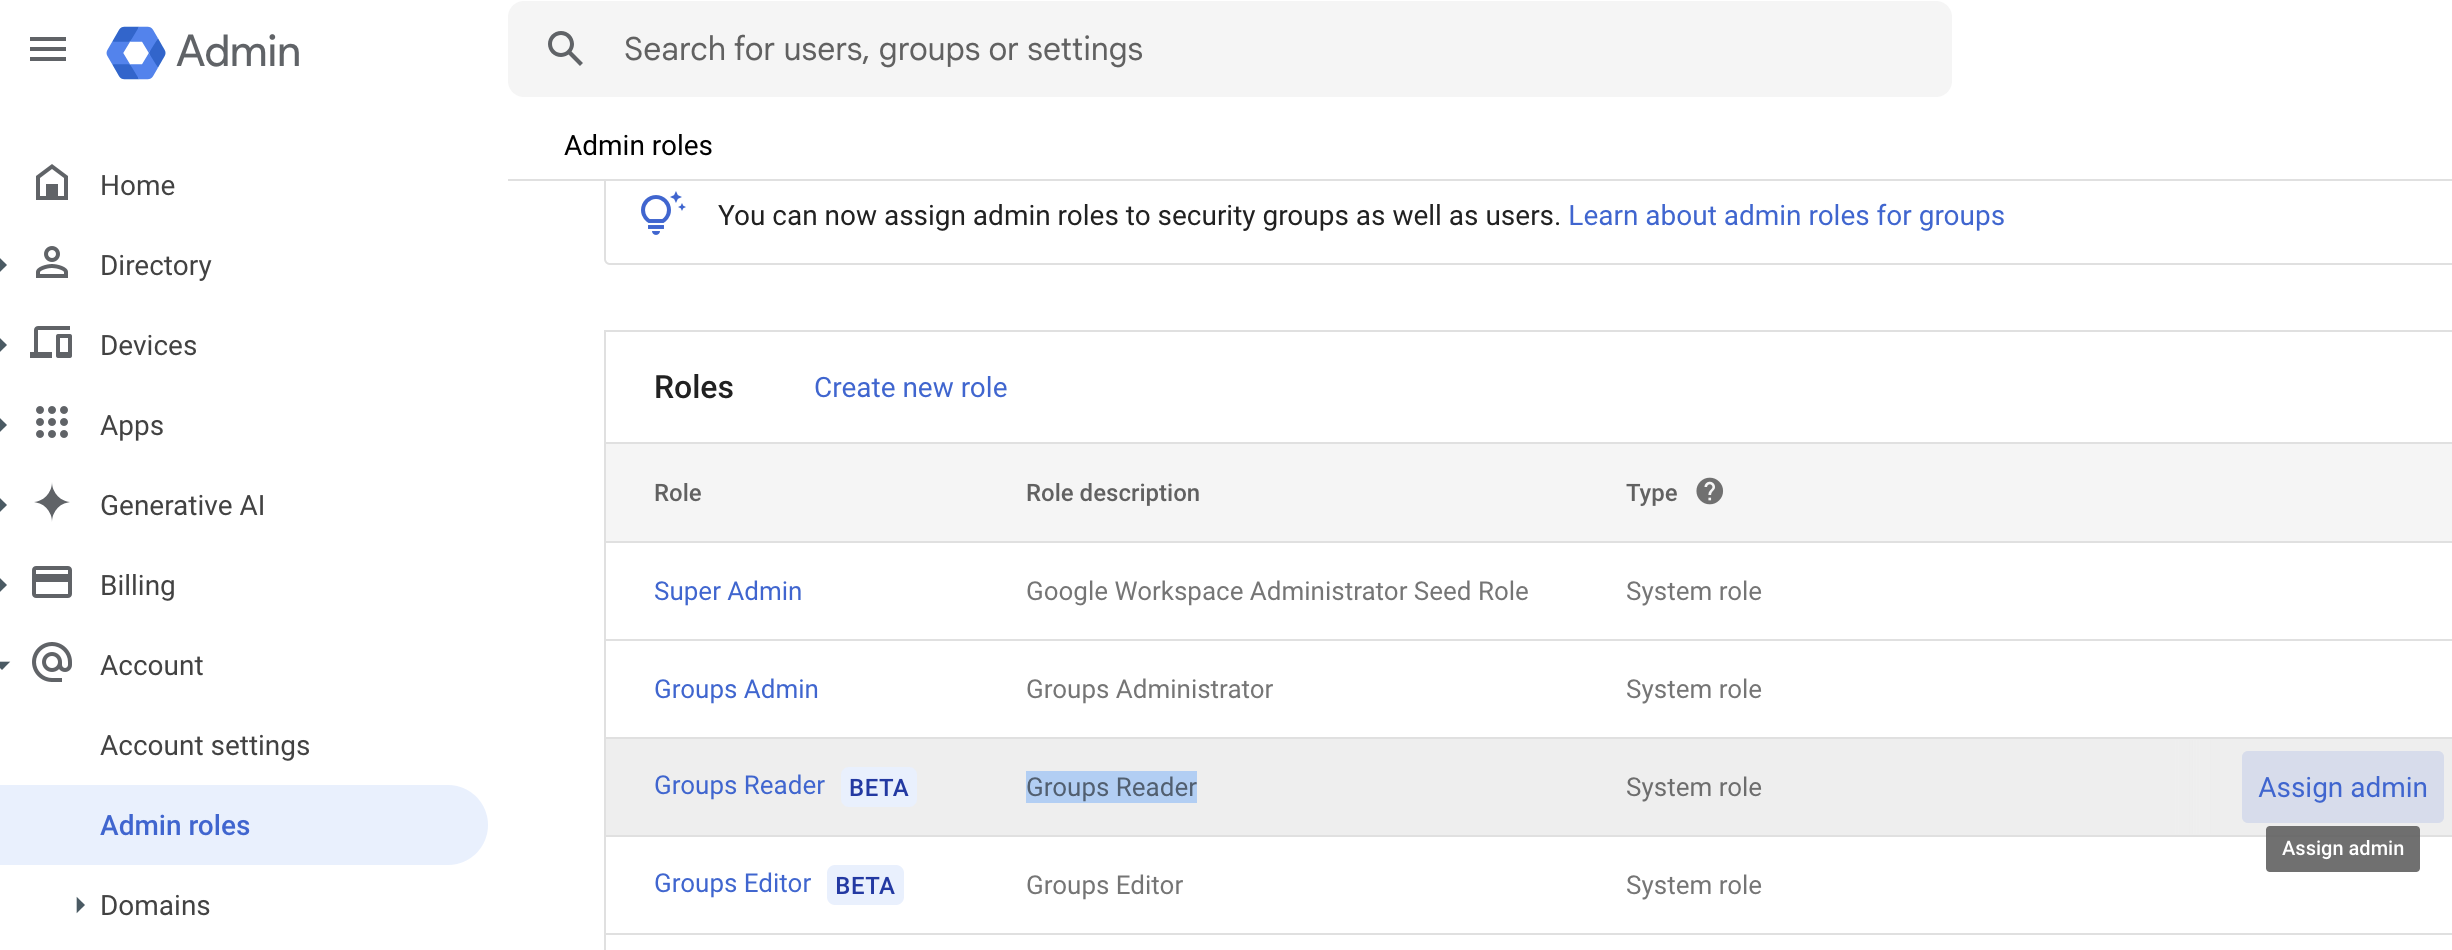
Next, either create a new account or select an existing account to designate as the groups reader. This account will need to be provided to Antimatter when creating the groups mapping. To assign the Groups Reader role, log into the google admin console, navigate to Account -> Admin roles, and select "Assign admin" when highlighting the "Groups Reader" row in the provided table. Enter the account details that you wish to provider to Antimatter to be used to retrieve group memberships. For the remainder of this guide, we will use reader@mycompany.com as the designated account with the Groups Reader role.
Creating a Capability Map
Once the Antimatter service account has been given the appropriate scope for your Google Workspace and you have designated an account with the Groups Reader role, a identity provider with a group mappings can be created. For this example, we have a Google Workspace that has a number of accounts and groups. The groups of interest are:
Sales:
Devops:
Engineers:
For each of these groups we want to have the following capability:
- sales ->
data-reader - devops ->
admin - engineers ->
admin
As both data-reader and admin already exist as default capabilities, we do not need to create them, and so we can go straight to creating the identity provider.
- Python
- CLI
import antimatter as am
from antimatter.builders import (
    IdentityProviderBuilder,
    GoogleOAuthGroupCapabilityMappingBuilder,
)
from antimatter.constants.identity_provider import ProviderType

amr = am.new_domain("test@mycompany.com")
amr.upsert_identity_provider(
    "mycompany",
    IdentityProviderBuilder()
    .set_provider_type(ProviderType.GoogleOAuth)
    .add_google_oauth_group_mappings(
        "reader@mycompany.com",
        "mycompany.com",
        [
            GoogleOAuthGroupCapabilityMappingBuilder().set_group("sales").add_capability("data-reader"),
            GoogleOAuthGroupCapabilityMappingBuilder().set_group("devops").add_capability("admin"),
            GoogleOAuthGroupCapabilityMappingBuilder().set_group("engineering").add_capability("admin"),
        ],
    ),
)
# Create a new identity provider
am idp create --name mycompany --type google

# Add a group mapping for [sales -> data-reader] to mycompany IDP
am idp group-mapping add \
    --identity-provider mycompany \
    --group-domain mycompany.com \
    --domain-group-reader-admin reader@mycompany.com \
    --group sales \
    --capability data-reader

# Add a group mapping for [devops -> admin] to mycompany IDP
am idp group-mapping add \
    --identity-provider mycompany \
    --group-domain mycompany.com \
    --domain-group-reader-admin reader@mycompany.com \
    --group devops \
    --capability admin

# Add a group mapping for [engineering -> admin] to mycompany IDP
am idp group-mapping add \
    --identity-provider mycompany \
    --group-domain mycompany.com \
    --domain-group-reader-admin reader@mycompany.com \
    --group sales \
    --capability engineering
Now when a user logs in via the "mycompany" identity provider, they will be assigned capabilities based on the groups they are part of in Goolge Workspace. For example, if you were to log in using alice@mycompany.com, you would be assigned both the admin and data-reader capabilities. However, if you were to log in using kim@mycompany.com, you would only get the data-reader capability. Logging in with michael@mycompany.com will result in no capabilities via the capability map, but could still have any additional capabilities manually added to the "mycompany" identity provider.