Azure hosted key
To allow root keys to be hosted externally, a number of key providers are supported. One such provider is the Azure Hardware Security Module (HSM). Currently, Antimatter supports holding the key in an Azure HSM and delegating access of the key to the Antimatter account.
At this time Antimatter only supports symmetric keys such as oct-HSM that support key wrapping. Currently, such keys
are only available with the Azure HSM and not via the Azure Key Vault. Please also note that running an Azure HSM has
an associated cost. More details can be found here.
Access the key management page.
- Dashboard
- CLI
If using the dashboard, navigate to Domain Configuration -> Encryption Rotation and select the option: "Change Root
Encryption Key Configuration"

This will redirect you to the key management modal where the REK source can be selected.
If using the CLI, a link to the key management page can be generated using the self-serve subcommand. First, ensure
the CLI is authenticated and using the relevant domain. You will need to provide an API key or specify a suitable Oauth
provider.
am config domain login --api-key <api-key>
Or
am config domain login --oauth-provider <provider>
Once the CLI is authenticated, the key management URL can be generated using:
am keys self-serve --vendor <company-name>
This will generate a URI for the key management landing page.
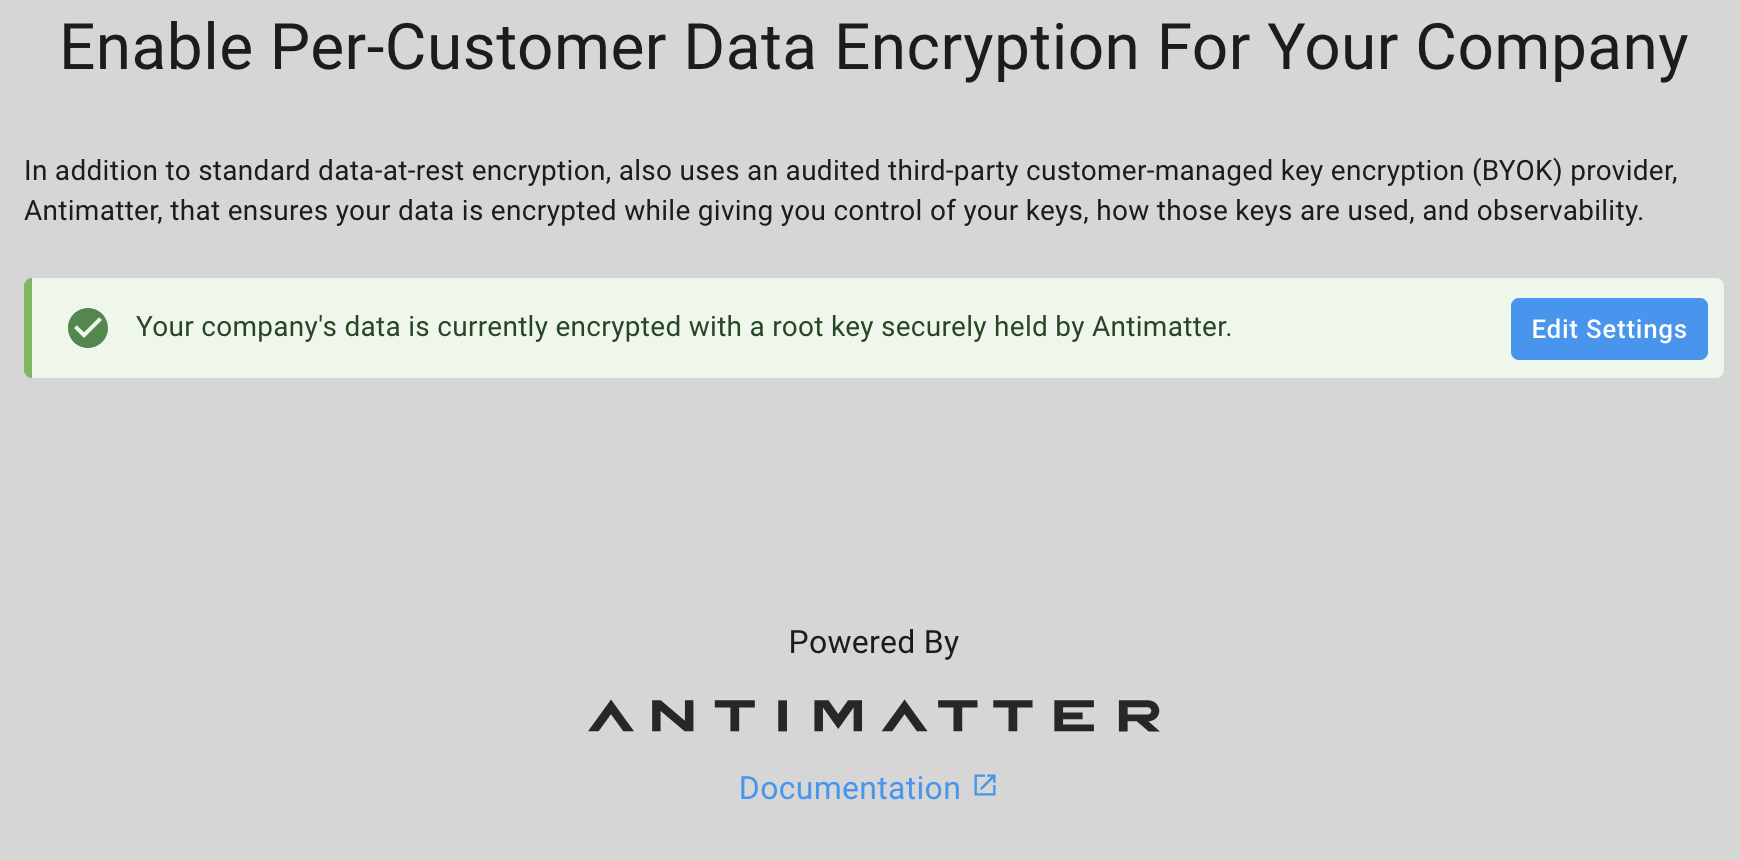
From here, select "Edit Settings" and you will be presented with the different key hosting options.
Adding an Azure Root Key
To delegate a key hosted by an Azure HSM for use by Antimatter, the following operations need to occur:
- A key must be created if it does not already exist.
- A label must be added to the key in the form
<domain-id>=allow. - Permission must be given to allow the Antimatter Azure application to have the correct role to access the key.
From the key management UI, delegating an Azure key is done by first selecting the option; "I want to configure my own externally-held key." and then selecting 'Next'. The user can then select a provider to host the key, for this example, select "Azure Hardware Security Module" and click 'Next'.
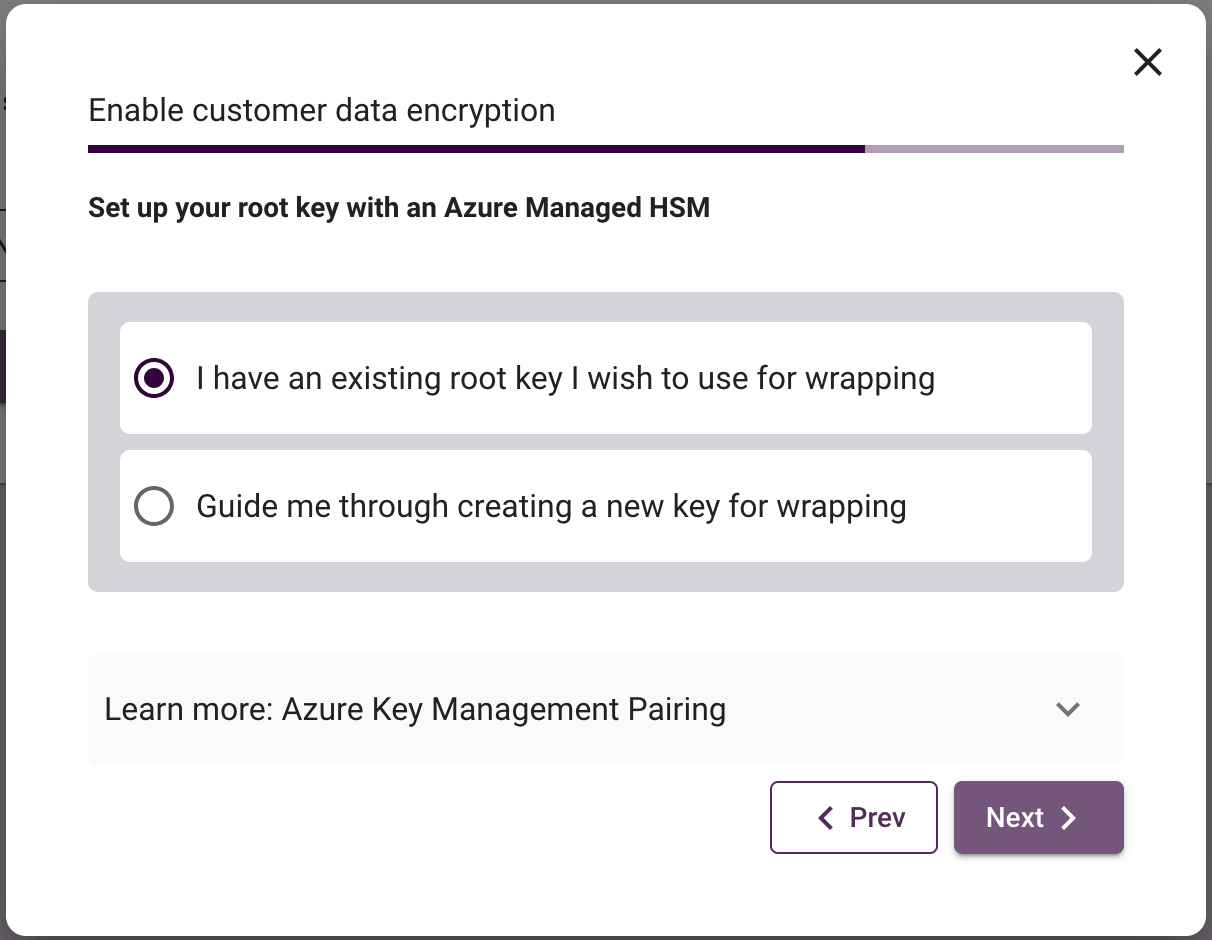
You will now be given the option to use either an existing key, or be guided through the process of creating a new one. In both cases, the next step will require access to a terminal with an authenticated azure client. The easiest way to do this is to use the Cloud Shell in the Azure portal.
- Existing Key
- New Key
If you wish to use an existing key, then select "I have an existing root key I wish to use for wrapping" and click 'Next'. On the subsequent pane, you will be asked to provide the following:
- HSM name: the name of the hardware security module that contains your key.
- Key name: the name of the key within the hardware security module to use.
After you have provided these values, select 'Generate' and this will produce a script that can be pasted into a terminal with access to the azure cli.
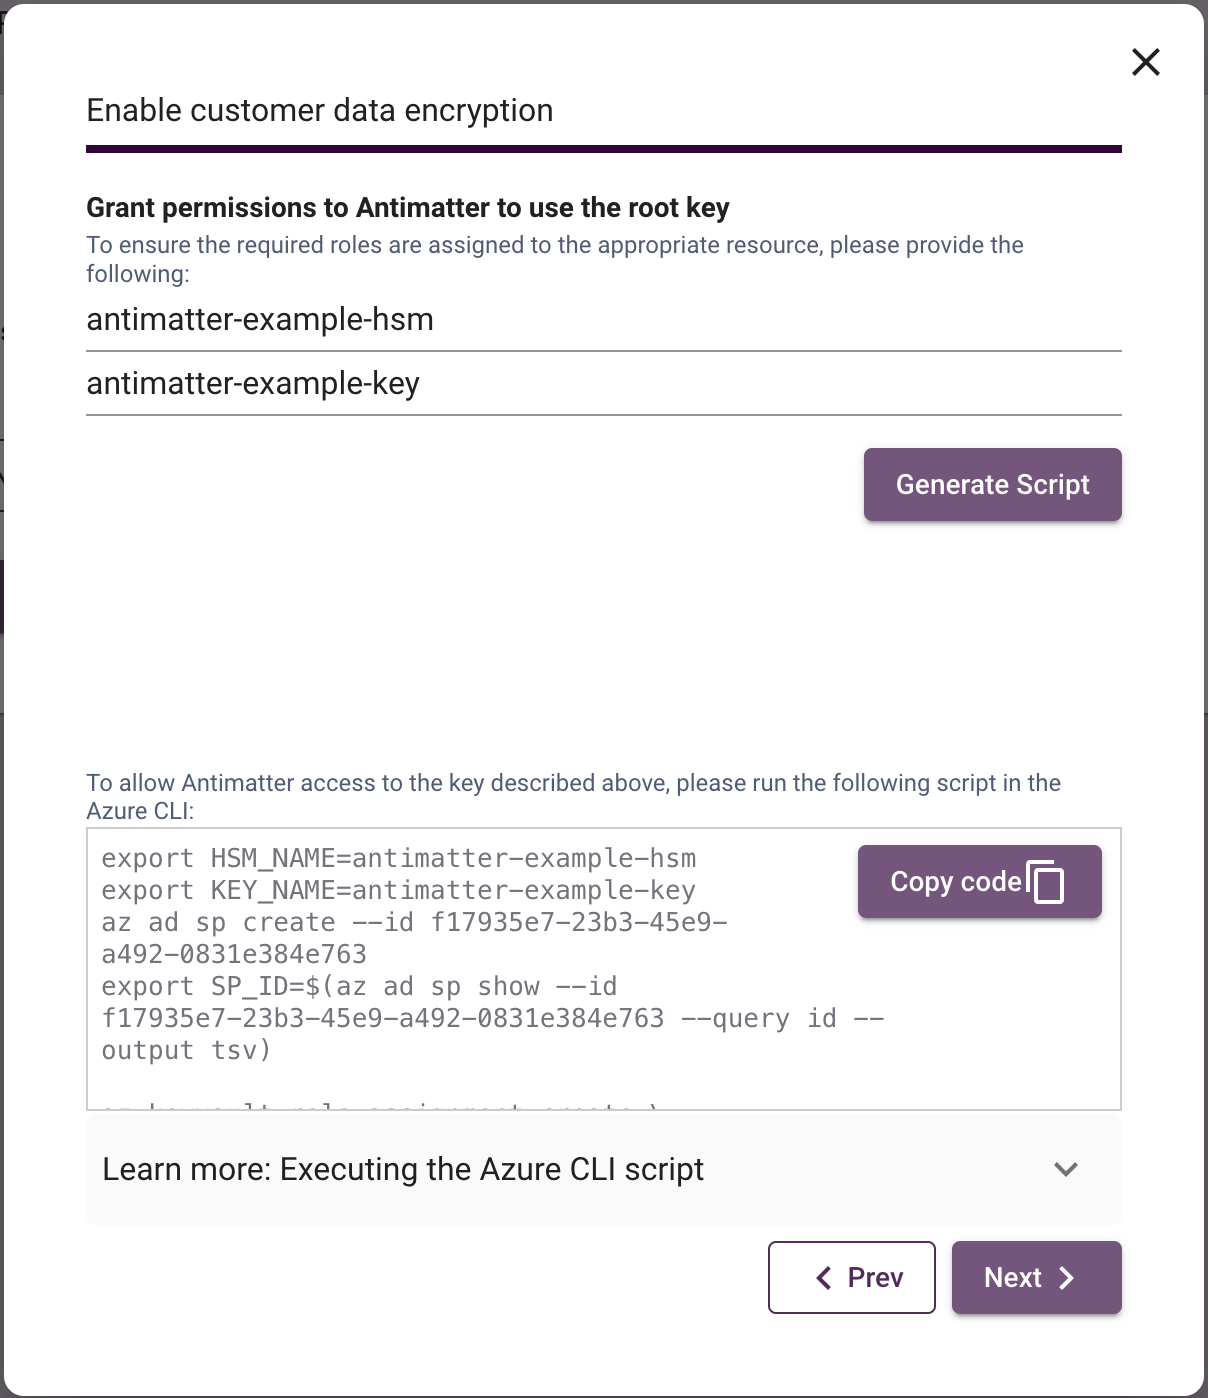
The script will perform the following actions:
- Create a Service Principal for the Antimatter application.
- Assign the role "Managed HSM Crypto User" to the Service Principal for the specified key.
- Add the tag
<domain-id>=allowto the specified key. - Print out the full key resource URL and tenant ID.
Note, it is important that the key includes the label <domain-id>=allow. This is required so that Antimatter can
confirm that the key supplied is intended for the domain. Removing the label or supplying a key that does not contain
it will result in Antimatter being unable to use it as a Root Key. Additionally, note the permissions added to the key.
These are the minimal permissions required to allow Antimatter to describe the key and use it to wrap internally
generated keys used for encryption.
Once run, the script will return the following (note this down for the final step):
Key URL (save this for next step): https://<hsm-name>.vault.azure.net/keys/<key-name>/<version>>
Tenant ID (save this for next step): <tenant-id>
If you wish to use a new key, then select "Guide me through creating a new key for wrapping" and click 'Next'. On the subsequent pane, you will be asked to provide the following:
- HSM name: the name of the hardware security module that contains your key.
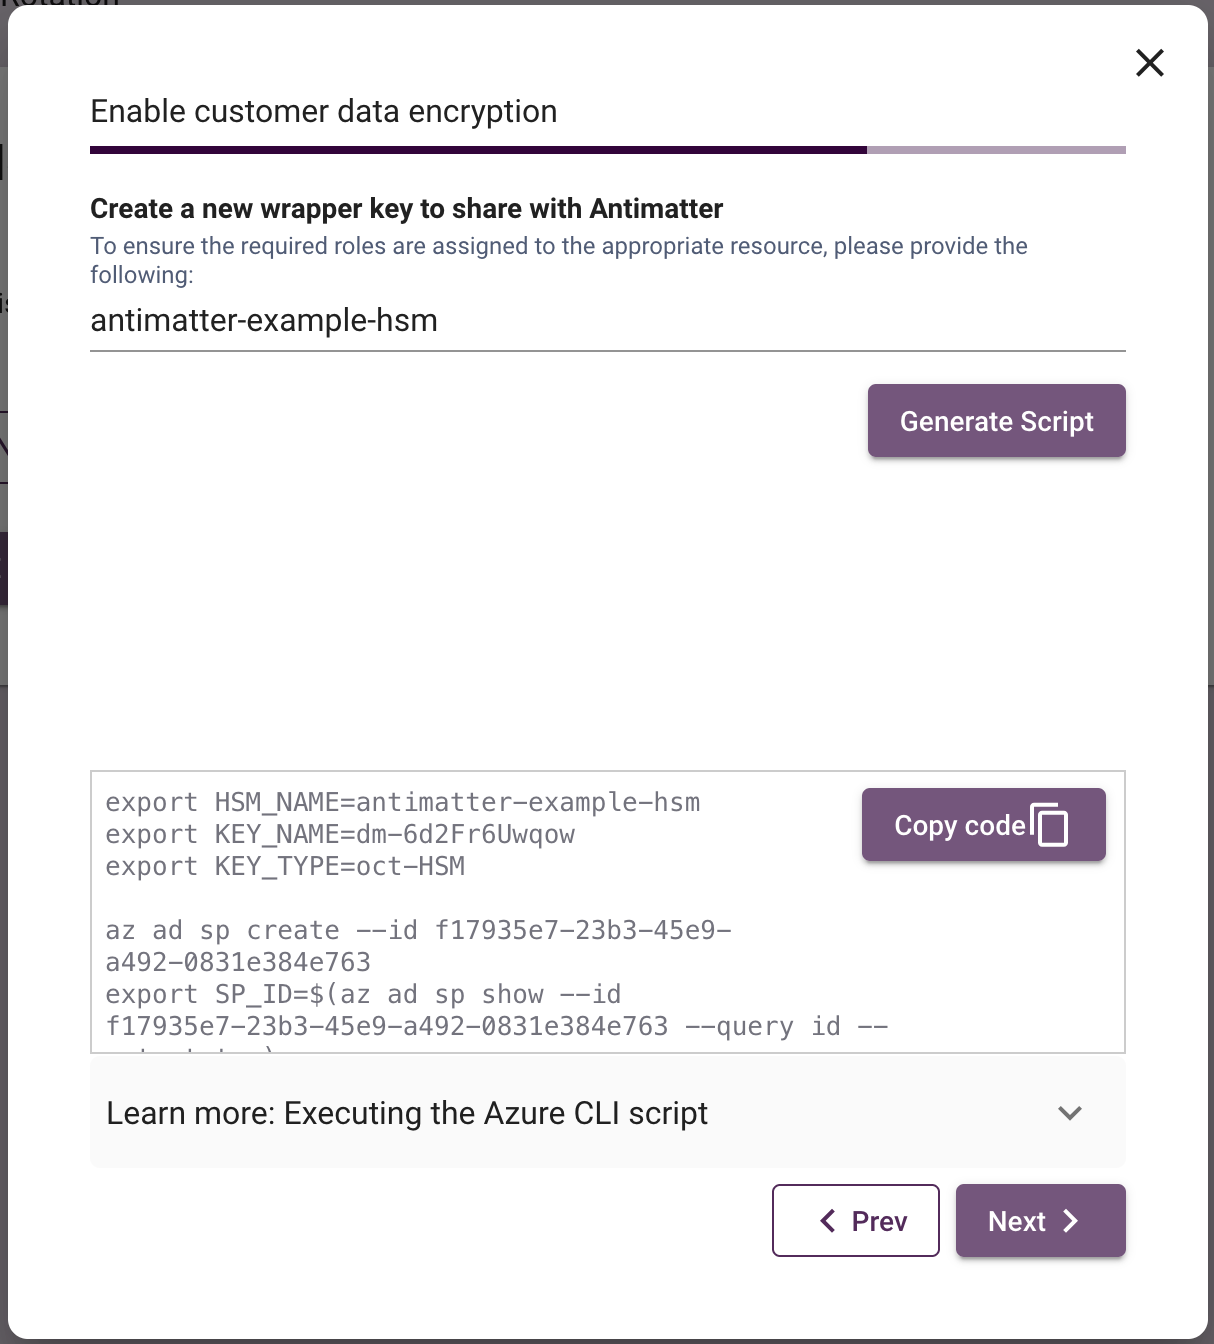
The script will perform the following actions:
- Create a Service Principal for tha antimatter application.
- Create a new key of type
oct-HSM. - Assign the role "Managed HSM Crypto User" to the Service Principal for the specified key.
- Add the tag
<domain-id>=allowto the specified key. - Print out the full key resource path.
Note, it is important that the key includes the label <domain-id>=allow. This is required so that Antimatter can
confirm that the key supplied is intended for the domain id. Removing the label or supplying a key that does not contain
it will result in Antimatter being unable to use it as a Root Key. Additionally, note the permissions added to the key.
These are the minimal permissions required to allow Antimatter to describe the key and use it to wrap internally
generated keys used for encryption.
Once run, the script will return the following (note this down for the final step):
Key URL (save this for next step): https://<hsm-name>.vault.azure.net/keys/<key-name>/<version>>
Tenant ID (save this for next step): <tenant-id>
After running the generated script, return to the key management page and click 'Next'. On the next pane you will be asked to submit the key URL and tenant ID that was printed. After pasting, click 'Apply' and wait for thepairing check to complete. Once complete, click 'Done'.