BYOK/HYOK
Let's walk through an example of how Antimatter meets Bring Your Own Key (BYOK) and Hold Your Own Key (HYOK) requirements
There are multiple ways to do this with Antimatter, this example shows you how you can do this with the CLI, or with the Python library.
Setup
First, let's get the python library or CLI set up with a new Antimatter domain:
- Python
- CLI
First, install the Antimatter Python library:
pip install antimatter==0.2.0
Now in Python (in a jupyter notebook, for example), create a new domain, caching the credentials for reuse
import antimatter
import json

# IMPORTANT: Change to your business email address to create a free account.
# Follow the link in your inbox to verify email address before proceeding.
my_email_address = "name@example.com"

try: # Reuse credentials if you've run the notebook before
    with open("domain_credentials.json", "r") as f:
        amr = antimatter.Session(**json.load(f))
except FileNotFoundError: # Make a new domain
    amr = antimatter.new_domain(my_email_address)
    with open("domain_credentials.json", "w") as f:
        json.dump(amr.config(), f)
    print ("New domain created - check your email before proceeding")
First download the CLI
sudo curl https://get.antimatter.io/cli/darwin/arm64/am -o /usr/local/bin/am

# or one of these if you are on Linux or Intel Mac
# sudo curl https://get.antimatter.io/cli/darwin/amd64/am -o /usr/local/bin/am
# sudo curl https://get.antimatter.io/cli/linux/amd64/am -o /usr/local/bin/am

# Make it executable
sudo chmod a+x /usr/local/bin/am
Then create a domain, or login to an existing domain
# IMPORTANT: Change to your business email address to create a free account.
# Follow the link in your inbox to verify email address before proceeding.
MY_EMAIL = "name@example.com"
am domain create --email $MY_EMAIL --display-name "My Domain" --make-default

# Or, for an existing domain
am config domain login --domain-id dm-xxxxxxxxxxx --api-key xxxxxxxxxxxxx
When you encapsulate data, it encrypted with a unique-per-capsule data encryption key. This data encryption key then gets encrypted with a unique-per-domain Key Encryption Key (KEK). The encrypted DEK is stored with the capsule. The Key Encryption Key is encrypted with the domain's active Root Encryption Key, and Antimatter stores the encrypted KEK.
The default Root Encryption Key is one that Antimatter manages, but we'll show you how you can hold your own REK.
For the purposes of encryption, the default write context (which doesn't do any scanning of the data for PII)
works fine.
- Python
- CLI
sensitive_data = "This is the data to be encrypted"
capsule = amr.encapsulate(sensitive_data, write_context="default")
# you can save this to a file
capsule.save("my_ciphertext.bin")
# or you can get the ciphertext bytes back and handle it yourself
ciphertext = capsule.raw
You can see that the data is encrypted:
print(ciphertext[:20])
Which shows
b'\x82\x88\x18\xf9\x18\xd8\x18\x84\x18S\x18\x90\x18\xc9\x02\x18h\x01\x82\x82'
The CLI can encapsulate data reading/writing to stdin and stdout. It can also write to file or read from file:
MYDATA="this is the data to be encrypted"
echo $MYDATA | am capsule encapsulate --write-context default > ciphertext.bin

echo $MYDATA > a_file.txt
am capsule encapsulate --in a_file --out ciphertext2.bin --write-context default

head -c32 ciphertext.bin | hexdump -C
Which shows the data is indeed encrypted:
00000000  82 88 18 f9 18 d8 18 84  18 53 18 90 18 c9 02 18  |.........S......|
00000010  68 01 82 82 49 2d e2 ce  61 29 54 a2 76 00 1b 00  |h...I-..a)T.v...|
In Python, encapsulate also supports various object types natively, so you can encapsulate Pandas dataframes, Pytorch data loaders, dicts, lists of dicts etc. This makes it easy to encrypt data and get back the same type of data without having to do any conversions:
capsule = amr.encapsulate({"sensitive":True,"data":"lots of it"}, write_context="default")
amr.load_capsule(data=capsule, read_context="default").data()
Which yields:
{'sensitive': True, 'data': 'lots of it'}
Hold your own key
The above shows encryption of data with unique Data Encryption Keys, but the Root Encryption Key is still the default one managed by Antimatter. It's really easy to configure your own Root Encryption Key, however, and to rotate the Key Encryption Keys over to the new REK.
To hold your own key, you need to choose where you want to hold it, and how you want to give Antimatter access to it. There are currently three supported methods (more coming soon):
- Hold the key in AWS KMS and delegate access to the key to the Antimatter account (most common)
- Hold the key in GCP Cloud Key Management and create a service account for Antimatter to use to access the key
- Hold the key in AWS KMS and create a service account for Antimatter to use to access the key
You can configure this key in three ways:
- Using the CLI
- Using the Python library
- For the AWS KMS delegated key option, you can use the key onboarding UI - this is best if you are wanting to let a third party (e.g. the customer) configure their key. We will be adding all the other key holding mechanisms to this UI really soon.
Adding keys using the CLI/Library
The first step in adding a new key using the CLI depends on what type of key you are adding. The subsequent steps are the same:
AWS Delegated Key
Let us set our root key to an AWS key that we delegate to the Antimatter AWS account. We're going to create and delegate this key using the AWS CLI. You can also run this in CloudShell in the AWS web console. Whether you run this locally or in CloudShell you will need a shell variable containing the correct domain identifier. Assuming the domain is currently default/active in the Antimatter command line tool (am), you can retrieve the domain using the command below. You will want to copy this value to use in the next step:
# Local command to get domain for copy/paste to CloudShell
am config domain get-active
dm-LCAJVnUE94B
Now let's cover the commands to run, starting with the setup of some useful variables including the domain ID you just retrieved above.
# Set up some useful variables
export DOMAIN_ID=dm-LCAJVnUE94B
export AWS_REGION=us-east-1
ACCOUNT_NUMBER=$(aws sts get-caller-identity \
                            --output text \
                            --query Account)

# Create the key and give it an alias (we will delegate the Alias to make key rotation easier)
KEY_ID=$(aws kms create-key --output text --query KeyMetadata.KeyId)
aws kms create-alias \
    --alias-name "alias/${DOMAIN_ID}/antimatter/MyCompanyName" \
    --target-key-id ${KEY_ID}

# Assign a policy to the key that allows your account full access, and gives Antimatter some limited access.
# 612795216151 is the Antimatter account number to use here
aws kms put-key-policy \
    --key-id ${KEY_ID} \
    --policy-name default \
    --policy "$(echo '{
  "Version": "2012-10-17",
  "Id": "antimatter-CompanyName",
  "Statement": [
    {
      "Sid": "Enable IAM User Permissions",
      "Effect": "Allow",
      "Principal": {
        "AWS": "arn:aws:iam::ACCOUNT_NUMBER:root"
      },
      "Action": "kms:*",
      "Resource": "*"
    },
    {
      "Sid": "grant access to account 612795216151",
      "Effect": "Allow",
      "Principal": {
        "AWS": "arn:aws:iam::612795216151:root"
      },
      "Action": [
        "kms:DescribeKey",
        "kms:CreateGrant",
        "kms:GenerateDataKeyWithoutPlaintext",
        "kms:Decrypt",
        "kms:ReEncryptFrom",
        "kms:ReEncryptTo"
      ],
      "Resource": "*"
    }
  ]
}' | sed "s/ACCOUNT_NUMBER/${ACCOUNT_NUMBER}/")"

# Now grab the ARN for the key alias. This is what you need to give to Antimatter:
ALIAS_ARN=$(aws kms list-aliases \
                --key-id ${KEY_ID} \
                --output text \
                --query 'Aliases[0].AliasArn')
echo "Key alias (save this for next step): ${ALIAS_ARN}"
Now that the key has been delegated, we need to add the key to Antimatter:
- Python
- CLI
# Fill in your key ARN here
key_arn="arn:aws:kms:us-east-1:810419701687:key/9496f347-fa59-4865-83ef-338eb88552ba"
amr.add_root_encryption_key(
    antimatter.antimatter_delegated_aws_key_info(key_arn)
)
# Fill in the Alias ARN here if you don't have it saved from above
am keys create --provider aws_am --key-arn ${ALIAS_ARN} --description "my new key"
This prints the new Root Encryption Key ID:
rekID: 741c476d-a7e0-52d2-974a-8ee9911549d7
Adding a Service-Account GCP key
Firstly, you need to create a key in GCP. To follow along, you will need an authenticated gcloud client. The easiest is to use Cloud Shell in the GCP web console. You can find other ways of creating a key in GCP in their documentation here.
First step is to create a keyring and key:
KEYRING_NAME="antimatter-rek"
PROJECT="my-gcp-project"
PROJECT="antimatter-dev-ephemeral-1"

gcloud services enable cloudkms.googleapis.com --project=${PROJECT}
gcloud kms keyrings create ${KEYRING_NAME} --location us-central1 --project=${PROJECT}
gcloud kms keys create root-key \
  --keyring ${KEYRING_NAME} \
  --purpose "encryption" \
  --location us-central1 \
  --project=${PROJECT}
Then you need to create a service account and give it access to this key:
SA_NAME="antimatter-rek"

gcloud iam service-accounts create ${SA_NAME} \
  --display-name ${SA_NAME} \
  --project=${PROJECT}

gcloud kms keyrings add-iam-policy-binding ${KEYRING_NAME} \
      --location us-central1 \
      --member serviceAccount:${SA_NAME}@${PROJECT}.iam.gserviceaccount.com \
      --role roles/cloudkms.cryptoKeyEncrypterDecrypter \
      --project=${PROJECT}

gcloud iam service-accounts keys create sa_credentials.json \
      --iam-account=${SA_NAME}@${PROJECT}.iam.gserviceaccount.com \
      --project=${PROJECT}
Now you can add the key to Antimatter:
- Python
- CLI
amr.add_root_encryption_key(antimatter.gcp_service_account_key_info(
    project_id="my-gcp-project",
    location="us-central1",
    key_ring_id="antimatter-rek",
    key_id="root-key",
    service_account_credentials_path="sa_credentials.json"
))
$ am keys create --provider gcp_sa \
  --project-id ${PROJECT} \
  --keyring-id ${KEYRING_NAME} \
  --key-id root-key \
  --location us-central1 \
  --description "my new key" \
  --service-account-credentials sa_credentials.json
Adding a Service-Account AWS KMS key
Although the delegated KMS key is the pattern that most BYOK/HYOK implementers have settled on, we also support access to a KMS key via a service account.
First, we obtain the correct domain identifier. If this is not known, you can get the active domain (used by the am CLI tool), using this command:
# Local command to get domain for copy/paste to CloudShell
am config domain get-active
dm-LCAJVnUE94B
First, we create the key and the alias. To follow along, you will need to use AWS CloudShell or have an authenticated AWS CLI tool locally:
# Set up some useful variables
export DOMAIN_ID=dm-LCAJVnUE94B
export KEY_ALIAS="alias/${DOMAIN_ID}/antimatter/MyCompanyName"
export AWS_REGION=us-east-1
ACCOUNT_NUMBER=$(aws sts get-caller-identity \
                            --output text \
                            --query Account)

# Create the key and give it an alias (we will delegate the Alias to make key rotation easier)
KEY_ID=$(aws kms create-key --output text --query KeyMetadata.KeyId)
aws kms create-alias \
    --alias-name "${KEY_ALIAS}" \
    --target-key-id ${KEY_ID}

# Now grab the Alias ARN so we can use it later.
ALIAS_ARN=$(aws kms list-aliases \
                --key-id ${KEY_ID} \
                --output text \
                --query 'Aliases[0].AliasArn')
Next we create an IAM user and give it limited access to the key alias
aws iam create-user --user-name AntimatterREKAccess

aws iam put-user-policy --user-name AntimatterREKAccess --policy-name AntimatterREKAccess \
  --policy-document "$(echo '{
  "Version": "2012-10-17",
  "Statement": [
    {
      "Effect": "Allow",
      "Action": [
        "kms:DescribeKey",
        "kms:CreateGrant",
        "kms:GenerateDataKeyWithoutPlaintext",
        "kms:Decrypt",
        "kms:ReEncryptFrom",
        "kms:ReEncryptTo",
        "kms:Encrypt"
      ],
      "Resource": "*",
      "Condition": {
        "ForAnyValue:StringEquals": {
          "kms:ResourceAliases": "KEY_ALIAS"
        }
      }
    }
  ]
}' | sed "s|KEY_ALIAS|${KEY_ALIAS}|")"
Finally, we get the credentials for this IAM user.
aws iam create-access-key --user-name AntimatterREKAccess
This should print something like this:
{
    "AccessKey": {
        "UserName": "AntimatterREKAccess",
        "AccessKeyId": "AKIA3ZMK73YH4FBPMAID",
        "Status": "Active",
        "SecretAccessKey": "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",
        "CreateDate": "2024-04-11T00:21:38+00:00"
    }
}
Save the SecretAccessKey and AccessKeyId for the next step, where we add the key to Antimatter:
- Python
- CLI
amr.add_root_encryption_key(antimatter.aws_service_account_key_info(
    access_key_id="AKIA3ZMK73YH4FBPMAID",
    secret_access_key="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",
    key_arn="arn:aws:kms:us-east-1:810429701647:alias/antimatter/MyCompanyName/current")
)
This will return the new REK ID:
'8639f379-b6d2-5294-9f55-b97e23065ad2'
KEY_ALIAS_ARN=arn:aws:kms:us-east-1:810429701647:alias/antimatter/MyCompanyName/current
AWS_ACCESS_KEY_ID=AKIA3ZMK73YH4FBPMAID
AWS_SECRET_ACCESS_KEY=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
am keys create --provider aws_sa \
               --access-key-id ${AWS_ACCESS_KEY_ID} \
               --secret-access ${AWS_SECRET_ACCESS_KEY} \
               --key-arn ${KEY_ALIAS_ARN} \
               --description 'my new key'
Activating a key
When the new key is added, you usually want to test that it's working, and then set it to be the active REK. Here is how you list your available keys, test one, and activate it:
- Python
- CLI
amr.list_root_encryption_keys()
Returns
[{'source': 'default',
  'var_resource_path': '',
  'rek_id': '5c33ab86-35e1-57ff-a567-ab1464b74ed1',
  'description': ''},
 {'source': 'aws_sa',
  'var_resource_path': 'arn:aws:kms:us-east-1:810429701647:alias/antimatter/MyCompanyName/current3',
  'rek_id': '8639f379-b6d2-5294-9f55-b97e23065ad2',
  'description': ''}]
To test a key:
amr.test_root_encryption_key('<your rek_id>')
Which returns
{'id': '04fda3aa-effc-54b6-807d-4a227ab428be',
 'source': 'gcp_sa',
 'var_resource_path': 'projects/my-gcp-project/locations/us-central1/keyRings/antimatter-rek/cryptoKeys/root-key',
 'description': 'my new key',
 'status': 'HEALTHY',
 'status_message': 'PASS',
 'latency_ms': 381.451}
And finally to activate a key:
amr.set_active_root_encryption_key("04fda3aa-effc-54b6-807d-4a227ab428be")
# List your keys
$ am keys list
- source: default
  resourcePath: ''
  rekID: d2cf9e22-751e-5600-a5e0-d51195a9cf36
  description: ''
- source: aws_am
  resourcePath: arn:aws:kms:us-east-1:810429701647:alias/antimatter/MyCompanyName/current
  rekID: 741c476d-a7e0-52d2-974a-8ee9911549d7
  description: my new key
- source: gcp_sa
  resourcePath: projects/my-gcp-project/locations/us-central1/keyRings/antimatter-rek/cryptoKeys/root-key
  rekID: 04fda3aa-effc-54b6-807d-4a227ab428be
  description: my new key

# Test one of the keys
$ am keys test --id <your new key rekID>
id: 741c476d-a7e0-52d2-974a-8ee9911549d7
source: aws_am
resourcePath: arn:aws:kms:us-east-1:810429701647:alias/antimatter/MyCompanyName/current
description: ''
status: HEALTHY
statusMessage: PASS
latencyMS: 413.151
If it says status: HEALTHY then you can set the new key to active:
$ am keys set-active --id <your new key rekID>
Delegated AWS KMS key (UI)
Another way to configure the Root Encryption Key is to generate a pre-authenticated URL that leads to the key onboarding UI. This is especially useful when implementing HYOK in an application where you would like customers to hold their own key.
Here is how you generate the URL. You pass it the name of your company (this is used in some of the wording on the page)
am keys self-serve --vendor MyCompanyName
It returns a fairly long pre-authenticated URL that looks something like this:
https://app.antimatter.io/settings/dm-CXCFRKeMhgR/byok?vendor=MyCompanyName&token=p2RBRUFE2eShgwcCoGVLZXlJRFAfoWZCf0cchJG3OeiAt4S1ZU5vbmNlTAAAAAAAAABYAAAAAGhEb21haW5JRG5kbS1DWENGUktlTWhnUmlFbmNyeXB0ZWRZAf3CO5ncOL9zqzjoh3%2FMW9LjYt4irZaiBtIFzthxDnC05E7vDYW9WRhkMyPX22bQ6xnekE7VUgrL32qtlO6Su223STgBzk4tTOmW7MRgmzYvV5L5eVOdVMeh1BByMVo4uX1XhxZkIqvyztfUdRQaJ9PbZsMIQHiid3MeQUT7R9crGHcAR9B%2BHNrVk6YWWb%2F6MByRqsfnKdtIxM%2FV68pmobpUBBA5CByszS0C6bsg7jeOwQzVkviH23J90Xe64emIWR26jX3JAulzW8n8RFOdxeKWFBdJ2io17EuRh60TfzVDqnpY0x9F2%2FoGQwVV3tsOrDmagVoivGjpjX6UuvW09M5bfxqvmfJl%2B9OYt0rUjzEZdSCDEEsWnDesQkAMYl2ciHNT3GMaDz4wDR2PlLj8Se3EBtiT8pOL8vS4FXqiYvpN7U7M6dpl0wr6gVhTZvL7aTSy%2F1MNYzUHI%2BV787dKITzZvITJBJfUqLBOSA2QxW69hSgGlDUoiXsMvQyvDp2ooftqyM2zRj%2F%2BX%2BYxYzvh6sH1JkWGhKZcaovvnBn1mwHYK3FTOBC8Zt8KpJaT2LqO4jfglhAtO0vJspYLCRQNgy4cgSbde3hkDXVPwbOkqVWDWMmuL%2Fwtt5qryA4NnU%2FP2tk2hZac8egG9G%2BPmLx0J5YzED1tA4DHnALWM0qCU21Ob3RWYWxpZEFmdGVyGmYXdqhuTm90VmFsaWRCZWZvcmUaZhc%2BXg%3D%3D
When you click this URL, you land on a page that lets you configure your key:
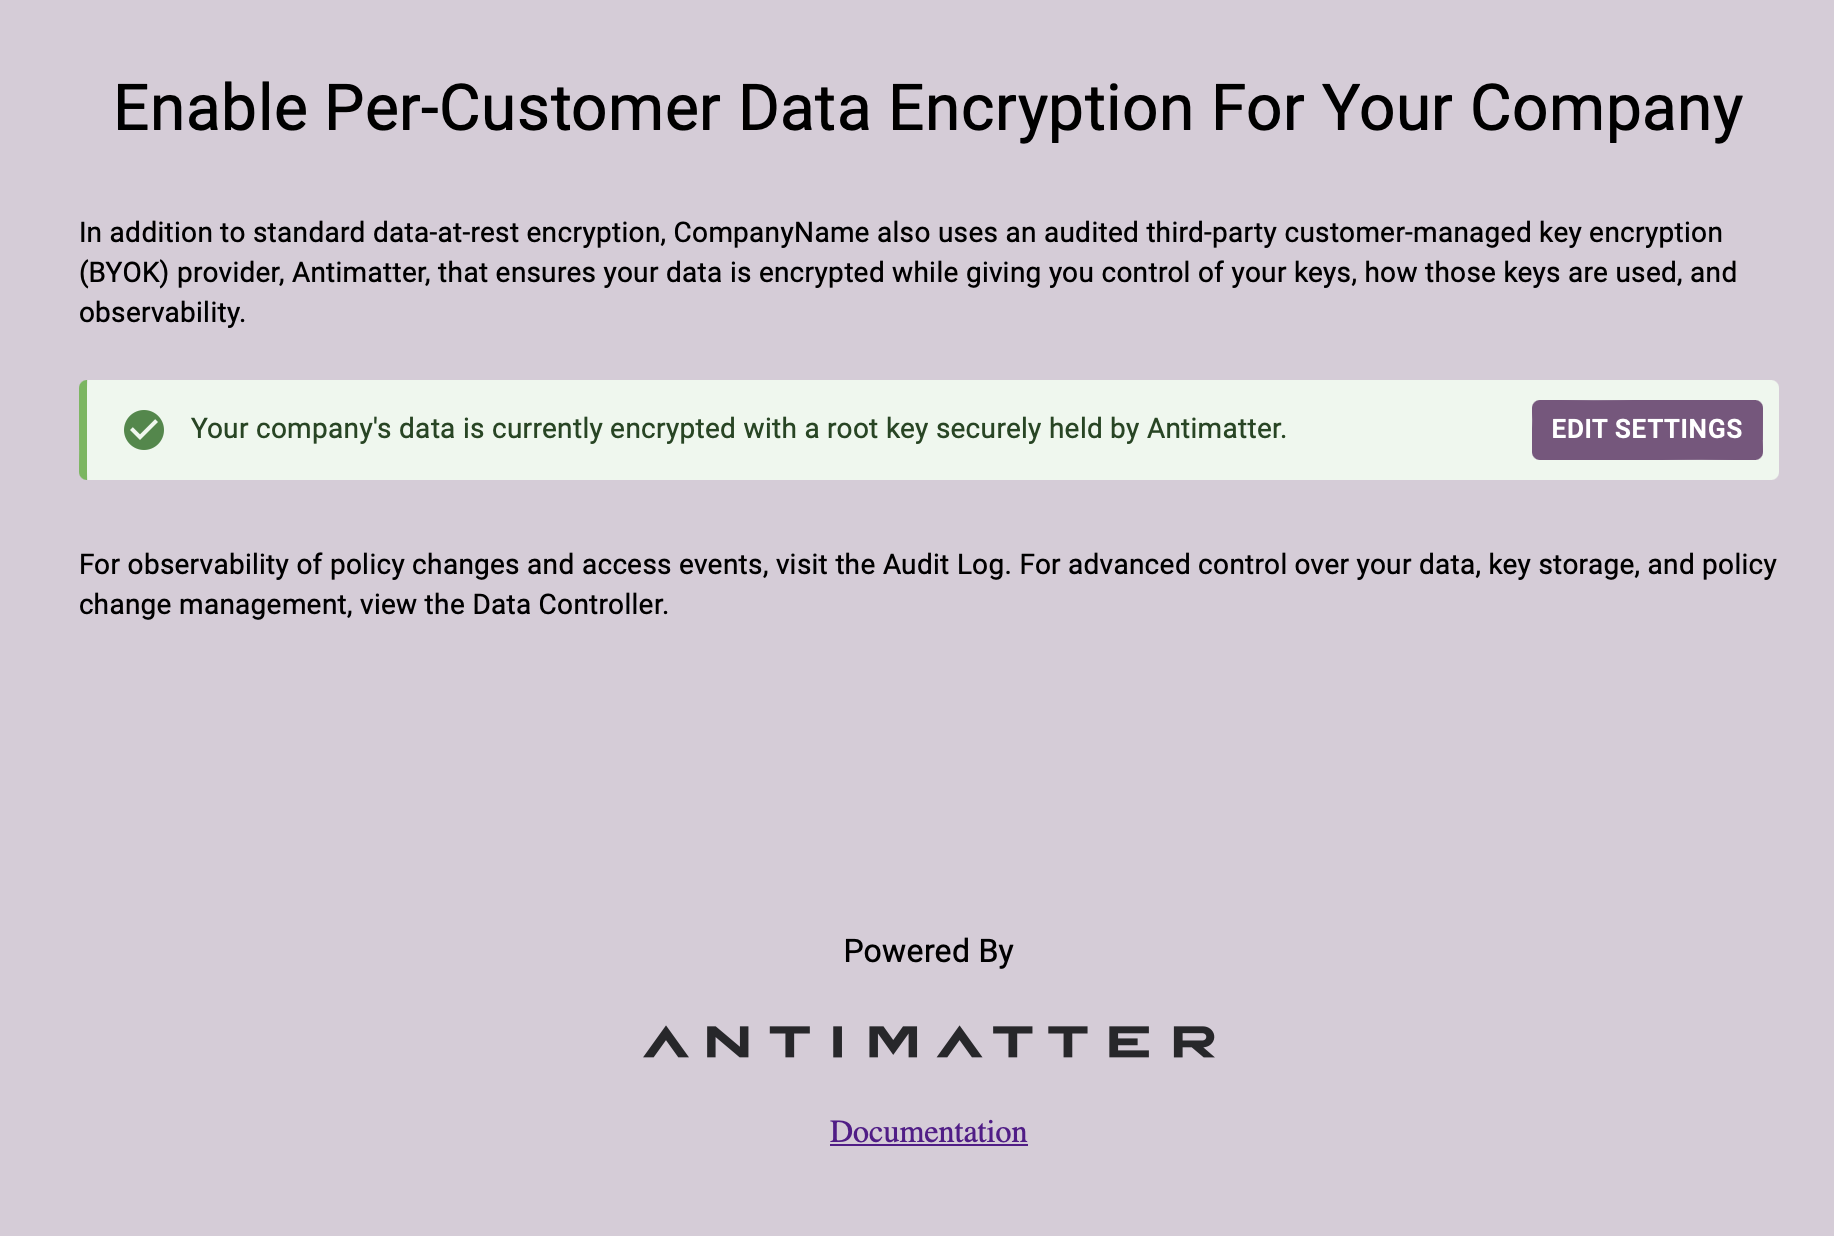
If you click "EDIT SETTINGS" you will get a choice to change your Root Encryption Key from the default one that Antimatter holds to one that you hold in your own infrastructure

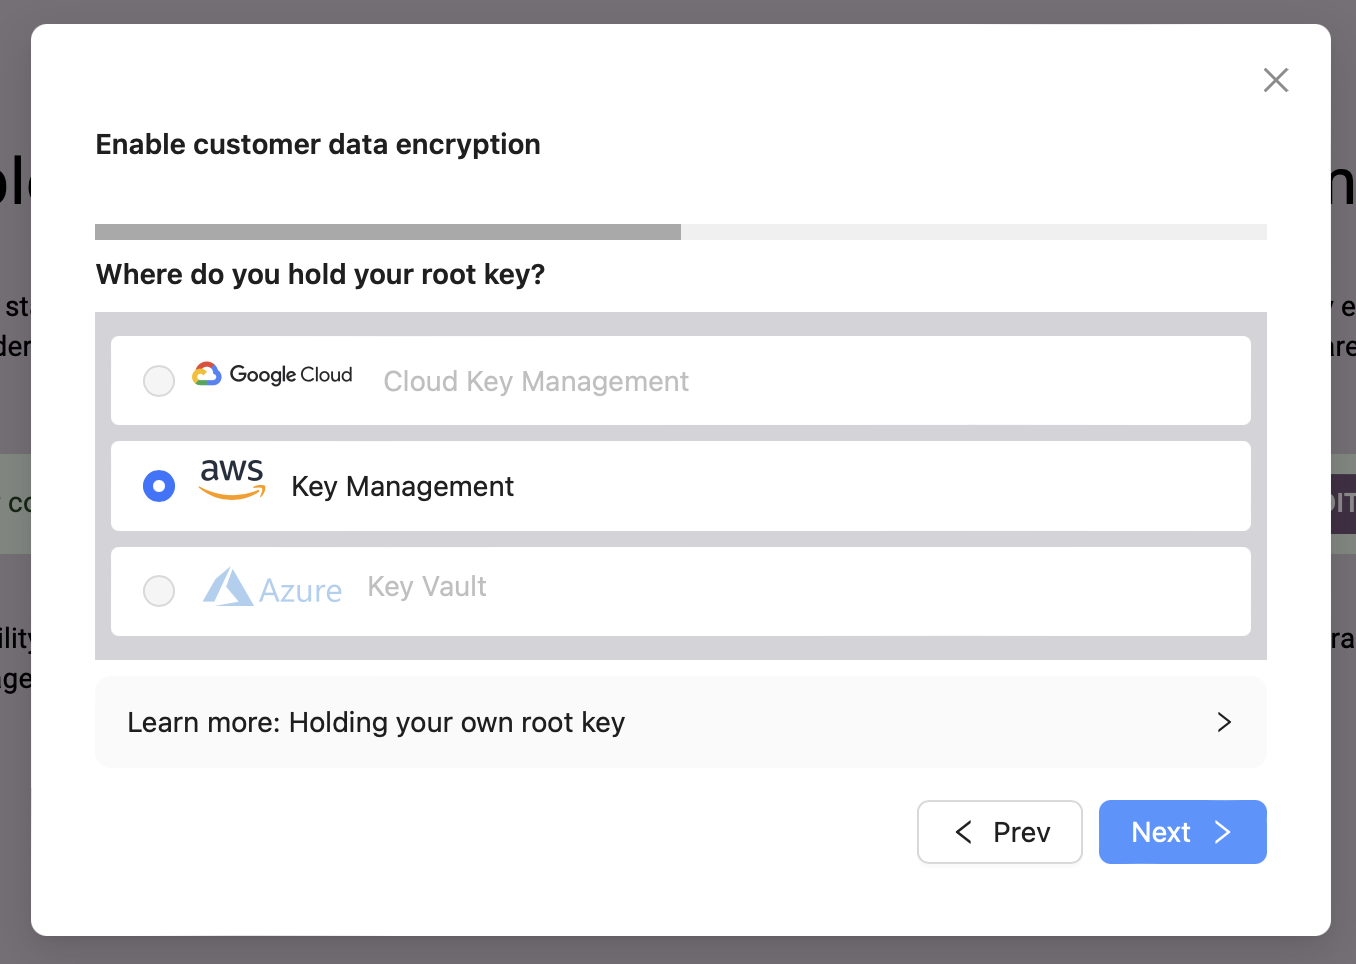
If you click "I want my company to hold a unique key" you get an option for where you want to hold your key. At the moment, this UI only supports the AWS delegated key configuration, but we will soon be adding GCP and Azure.
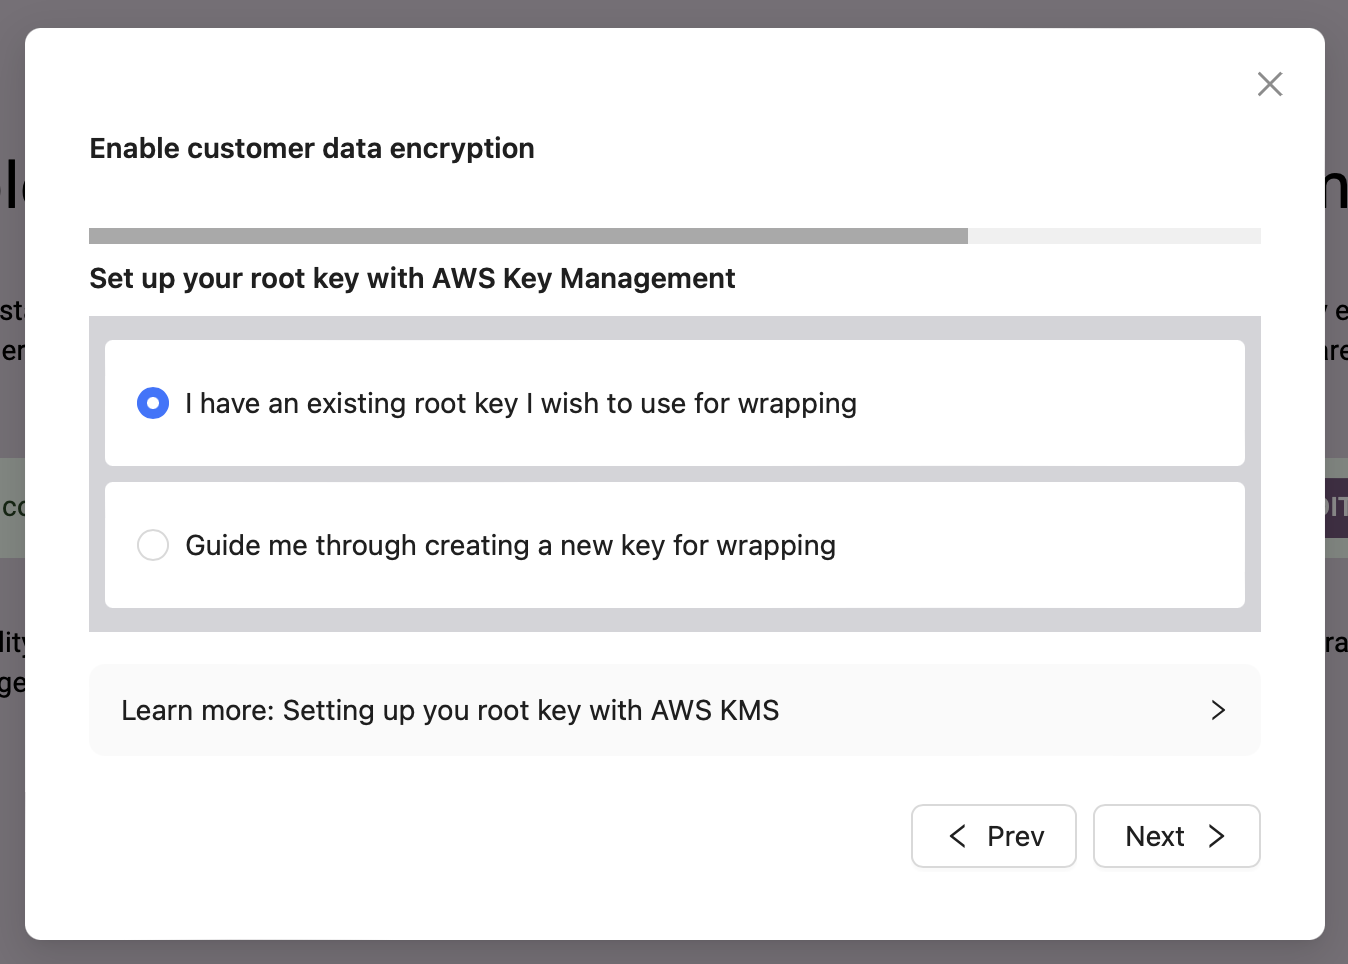
Next, you get to pick if you would like to onboard an existing key, or create a new one. Let's create a new one.
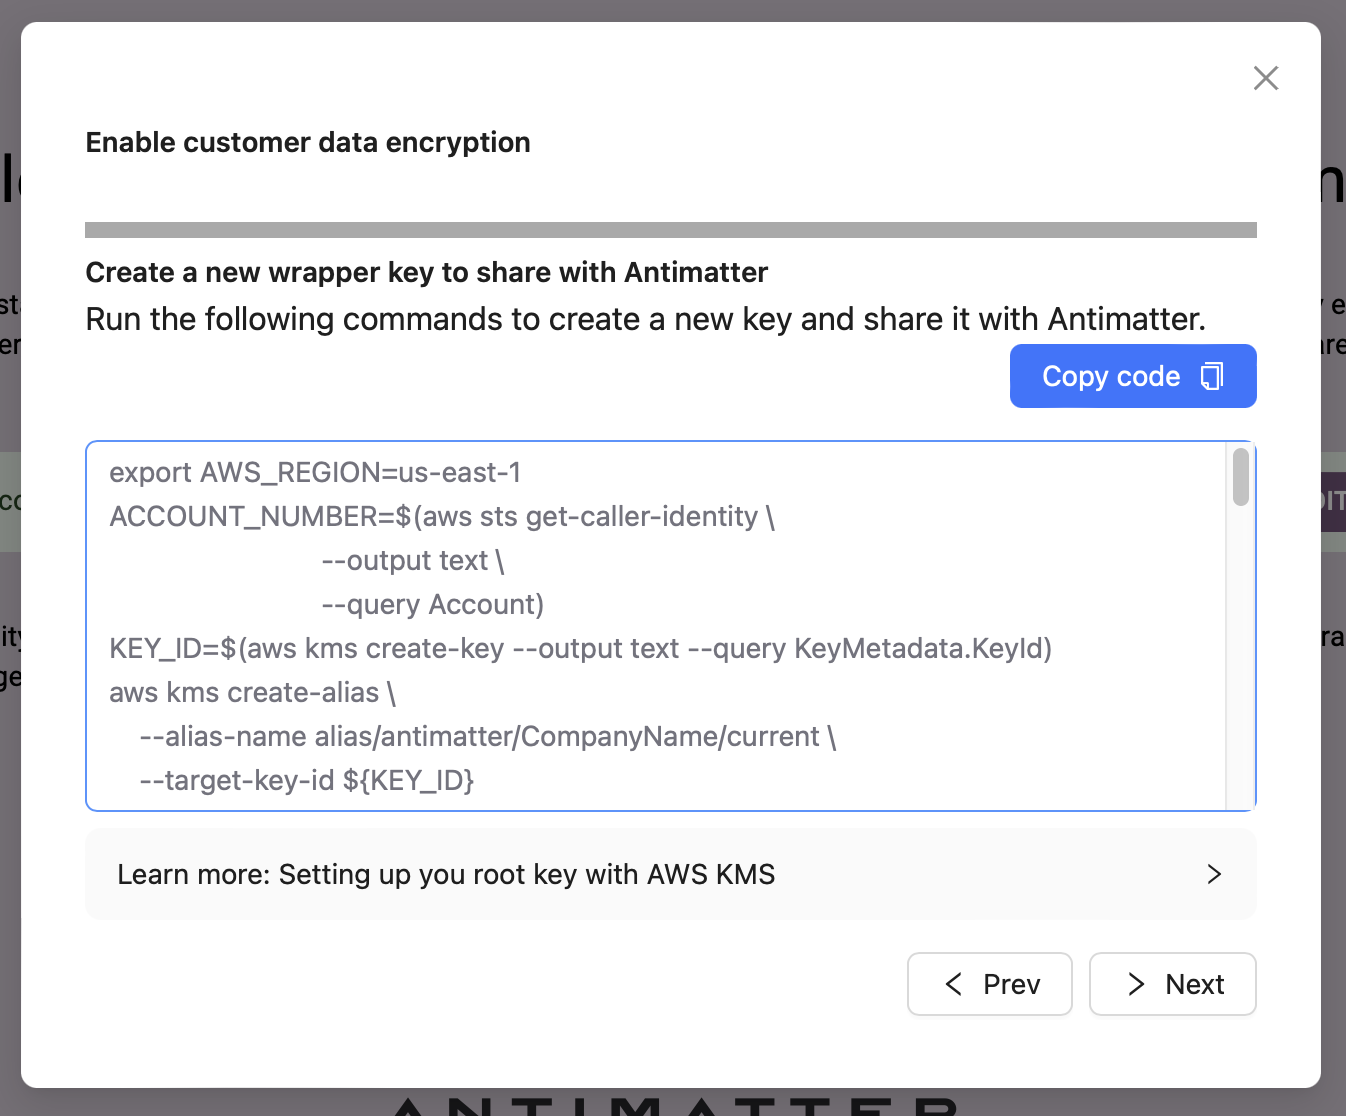
When you click create a new key, you will get a short set of commands that you can copy-paste into either CloudShell in the AWS terminal or into a terminal that has an authenticated AWS CLI configured. These are the same commands we ran manually in the Delegated AWS Key (CLI/Library) section above.
Finally, you enter the Alias ARN into the next screen and click Apply.
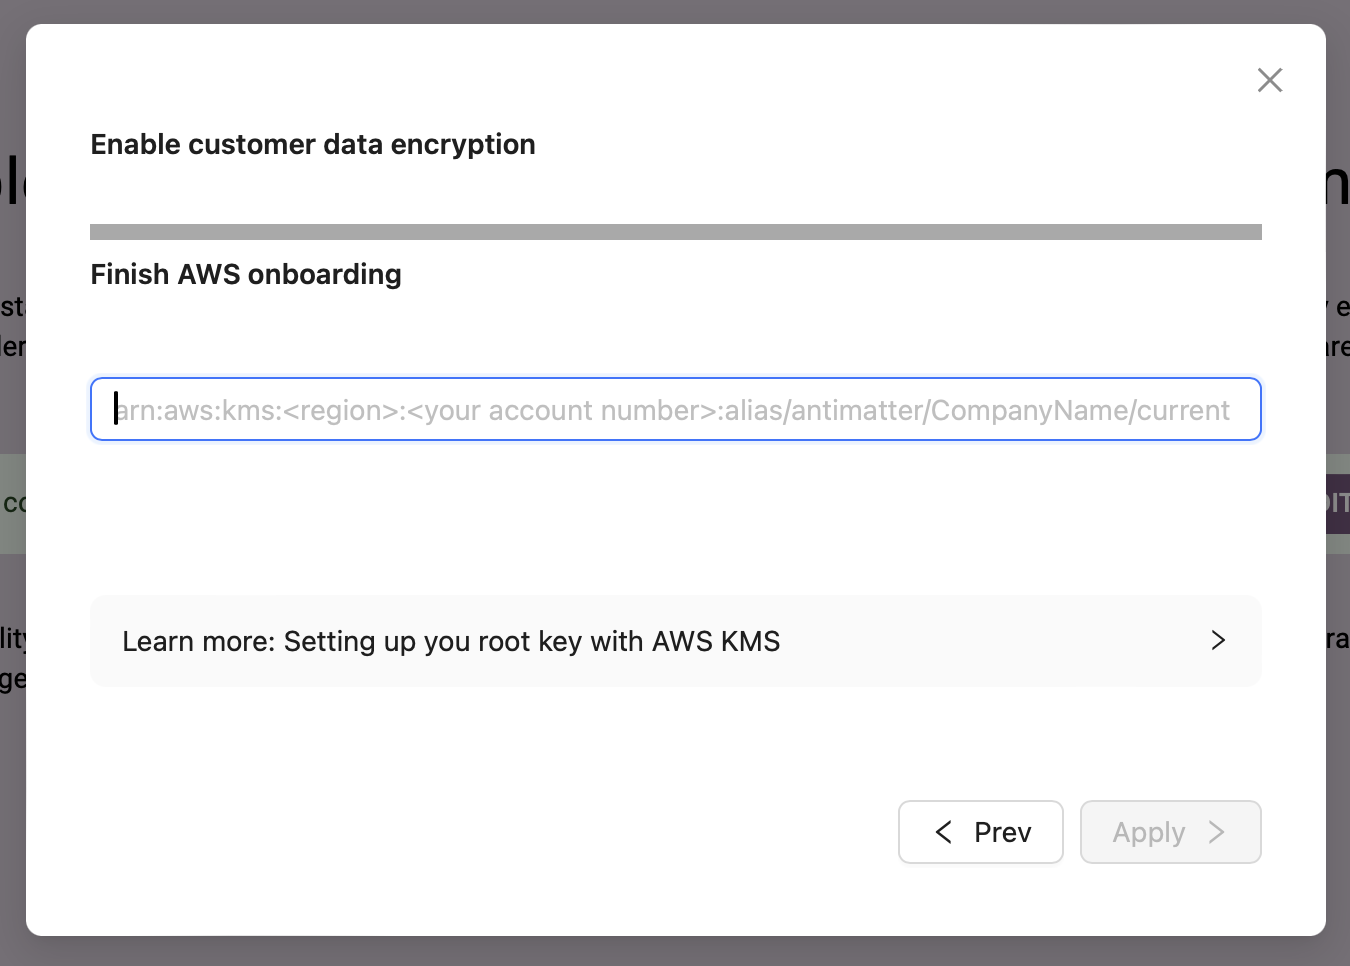
After you click apply, the key is briefly tested, and immediately marked active.
We will be adding utility functions to all the language libraries to generate the pre-authenticated URLs very soon. For now you can either use the am CLI or look at an example of how to generate the URLs using curl commands here.
Key rotation
Whenever the active Root Encryption Key is changed, a new Key Encryption Key is immediately generated. All future capsules that are created will automatically be encrypted using the new KEK, and therefore the new Root Encryption Key.
There is still data encrypted under the previous keys, however. You will notice that if you attempt to remove an old key that is still required to access some capsules, that you will receive an error (Antimatter will not let you remove a key if it would lead to data loss).
In order to rotate all the old Key Encryption Keys and re-encrypt them under the new Root Encryption Key, you need to call rotate. This
is a batched operation that does 100 KEKs at a time, so you may need to call it more than once if it returns has_more
as True:
- Python
- CLI
amr.rotate_encryption_keys()
Which returns:
{'has_more': False}
am keys rotate
Which will print the following, once all keys have been rotated:
Key Encryption Keys rotated
All KEKs are now encrypted with the active Root Encryption Key
Once that has been done, you can remove any of the non-active Root Encryption Keys (the default key cannot be removed).